Smart Checkout Integration
A guide to the integration process for Smart Checkout.
- Before you start
- Integration flow diagram
- Integration flow instructions
- Integrate a mobile app with Smart Checkout
- Go-Live
- Additional use cases
- Further Information
- Get Support
Before you start
- Create an account with Viva, if you do not already have one:
- Sandbox/demo account, for testing purposes
- Production/live account, for payments in the real world
- Log in to your demo account or live account
- Create a payment source in order to provide details such as your domain name for your online store, your company logo, your success (thank you) page, and so on.
Make a note of the source code, i.e. the 4-digit code of the payment source, you just created, as you will need it later on. It is important to provide your company logo, as this will be presented to the customer on Smart Checkout, and it will help the customer understand who this payment is for - Determine which payment methods you want to offer to your customers. Some of these payment methods are automatically activated for you by us (e.g. Apple Pay), other payment methods can only be activated by yourself (e.g. PayPal), for others you need to get in touch with us to activate them for you after a further review of your business
Payment method messaging
It is important that the customer is aware of the payment methods you offer via Smart Checkout, as this will increase conversion and average order values.
You should let your customers know about the available payment options as they browse your online store, even before they decide to buy. Informing them early on will help the purchase decision, especially when offering BNPL or financing options. Doing so will create trust and let the customer know they can pay with whatever payment method is convenient to them. This is especially helpful for your international customers, as they will know they can pay with their own local payment method, even though they are shopping from a merchant from another country.
Display payment method icons or banners throughout your online store (indicatively: footer, homepage, product display page, cart/basket page, checkout, and so on) to captivate shoppers from the start, make your customers shop with confidence, help shoppers find the answers to their most commonly asked questions, and increase conversion. Especially when offering BNPL or financing options, inform your customers about their options as early as possible.
You can potentially include icons of the offered payment methods in:
- The footer or header of your online store
- The individual product pages
- The checkout page before redirecting the customer to Smart Checkout
Consider also including an FAQ to tell your customers everything they want to know about how to buy from you and all the payment methods you offer. This way, you’ll reduce any friction in the purchase journey as well as reducing contacts to your customer service team.
Integration flow diagram
The below sequence diagram outlines the Smart Checkout integration procedure from beginning to end.
Integration flow instructions
The overall integration process is as follows:
- Create the payment order
- Redirect the customer to Smart Checkout to pay the payment order
- Confirm the payment of the payment order
- Verify payment
Step 1: Create the payment order
You need to create a payment order every time you want to tell Viva that you require a certain amount of money from one of your customers. Think of it as a utility bill. You give Viva an order to issue a bill on your behalf. The bill is then sent to your customer and they have to pay a specific amount. Each Payment Order has a unique 16-digit ID also referred to as the order code.
Keep in mind that you need to define the sourceCode parameter when creating the payment order, i.e. the 4-digit code of the payment source you have created (please refer to the Before you start section above). The payment sources you have created can be found in your viva banking app under the payment sources for your website / app.
Best practices
fullName, email, customerTrns, requestLang and countryCode parameters are optional, it is highly recommended to provide them as they will encourage high conversion rates:
fullNameandemailare requested by the customer in order to proceed with the payment, if not specified during the creation of the payment order (asking the customer to provide information that he has already provided creates frustration and may cause them to abandon the checkout process)customerTrnsprovides information about what the customer is being asked to pay for (it is good practice to provide a reminder description of what they are paying for). Please note: you can also copy and paste emojis into this field if desired 😃requestLangindicates the language that the payment page will appear in (make sure the customer views the payment page in their language, which is especially important for online stores with international customers)countryCodeindicates the country of the customer, which affects the payment methods that will be offered to the customer; keep in mind that certain payment methods are available only to customers that live in specific countries (make sure the customer is offered payment methods that they are familiar with and tend to use)
Step 2: Redirect the customer to Smart Checkout to pay the payment order
Redirect the customer to the Viva Smart Checkout via a browser using the below URI format. Replace the OrderCode value with the one generated in the previous step.
string format, rather than integer format, in order to avoid exceeding JavaScript’s MAX_SAFE_INTEGER value of 9,007,199,254,740,991. Otherwise, you may run into ‘OrderCode not found’ and similar errors
| Environment | URL |
|---|---|
| Production | https://www.vivapayments.com/web/checkout?ref={OrderCode} |
| Demo | https://demo.vivapayments.com/web/checkout?ref={OrderCode} |
Features that will not be available by using an iframe: paying with Apple Pay, saving cards or using saved cards, paying with certain payment methods (that require a redirection of their own such as Klarna, BLIK, EPS, P24, PayU & IRIS), remembering customer preferences (previously used payment methods, previously selected language, etc), dynamically showing payment methods most likely to convert, paying with Viva Wallet, and more.
The customer experience will also be poor due to the risk of: poor screen layouts, content spilling over several screens and content being inaccessible due to poor positioning. Note also that some browsers do not properly support iframes, including the one within the Facebook mobile app, so your customers may be unable to even view your payment page.
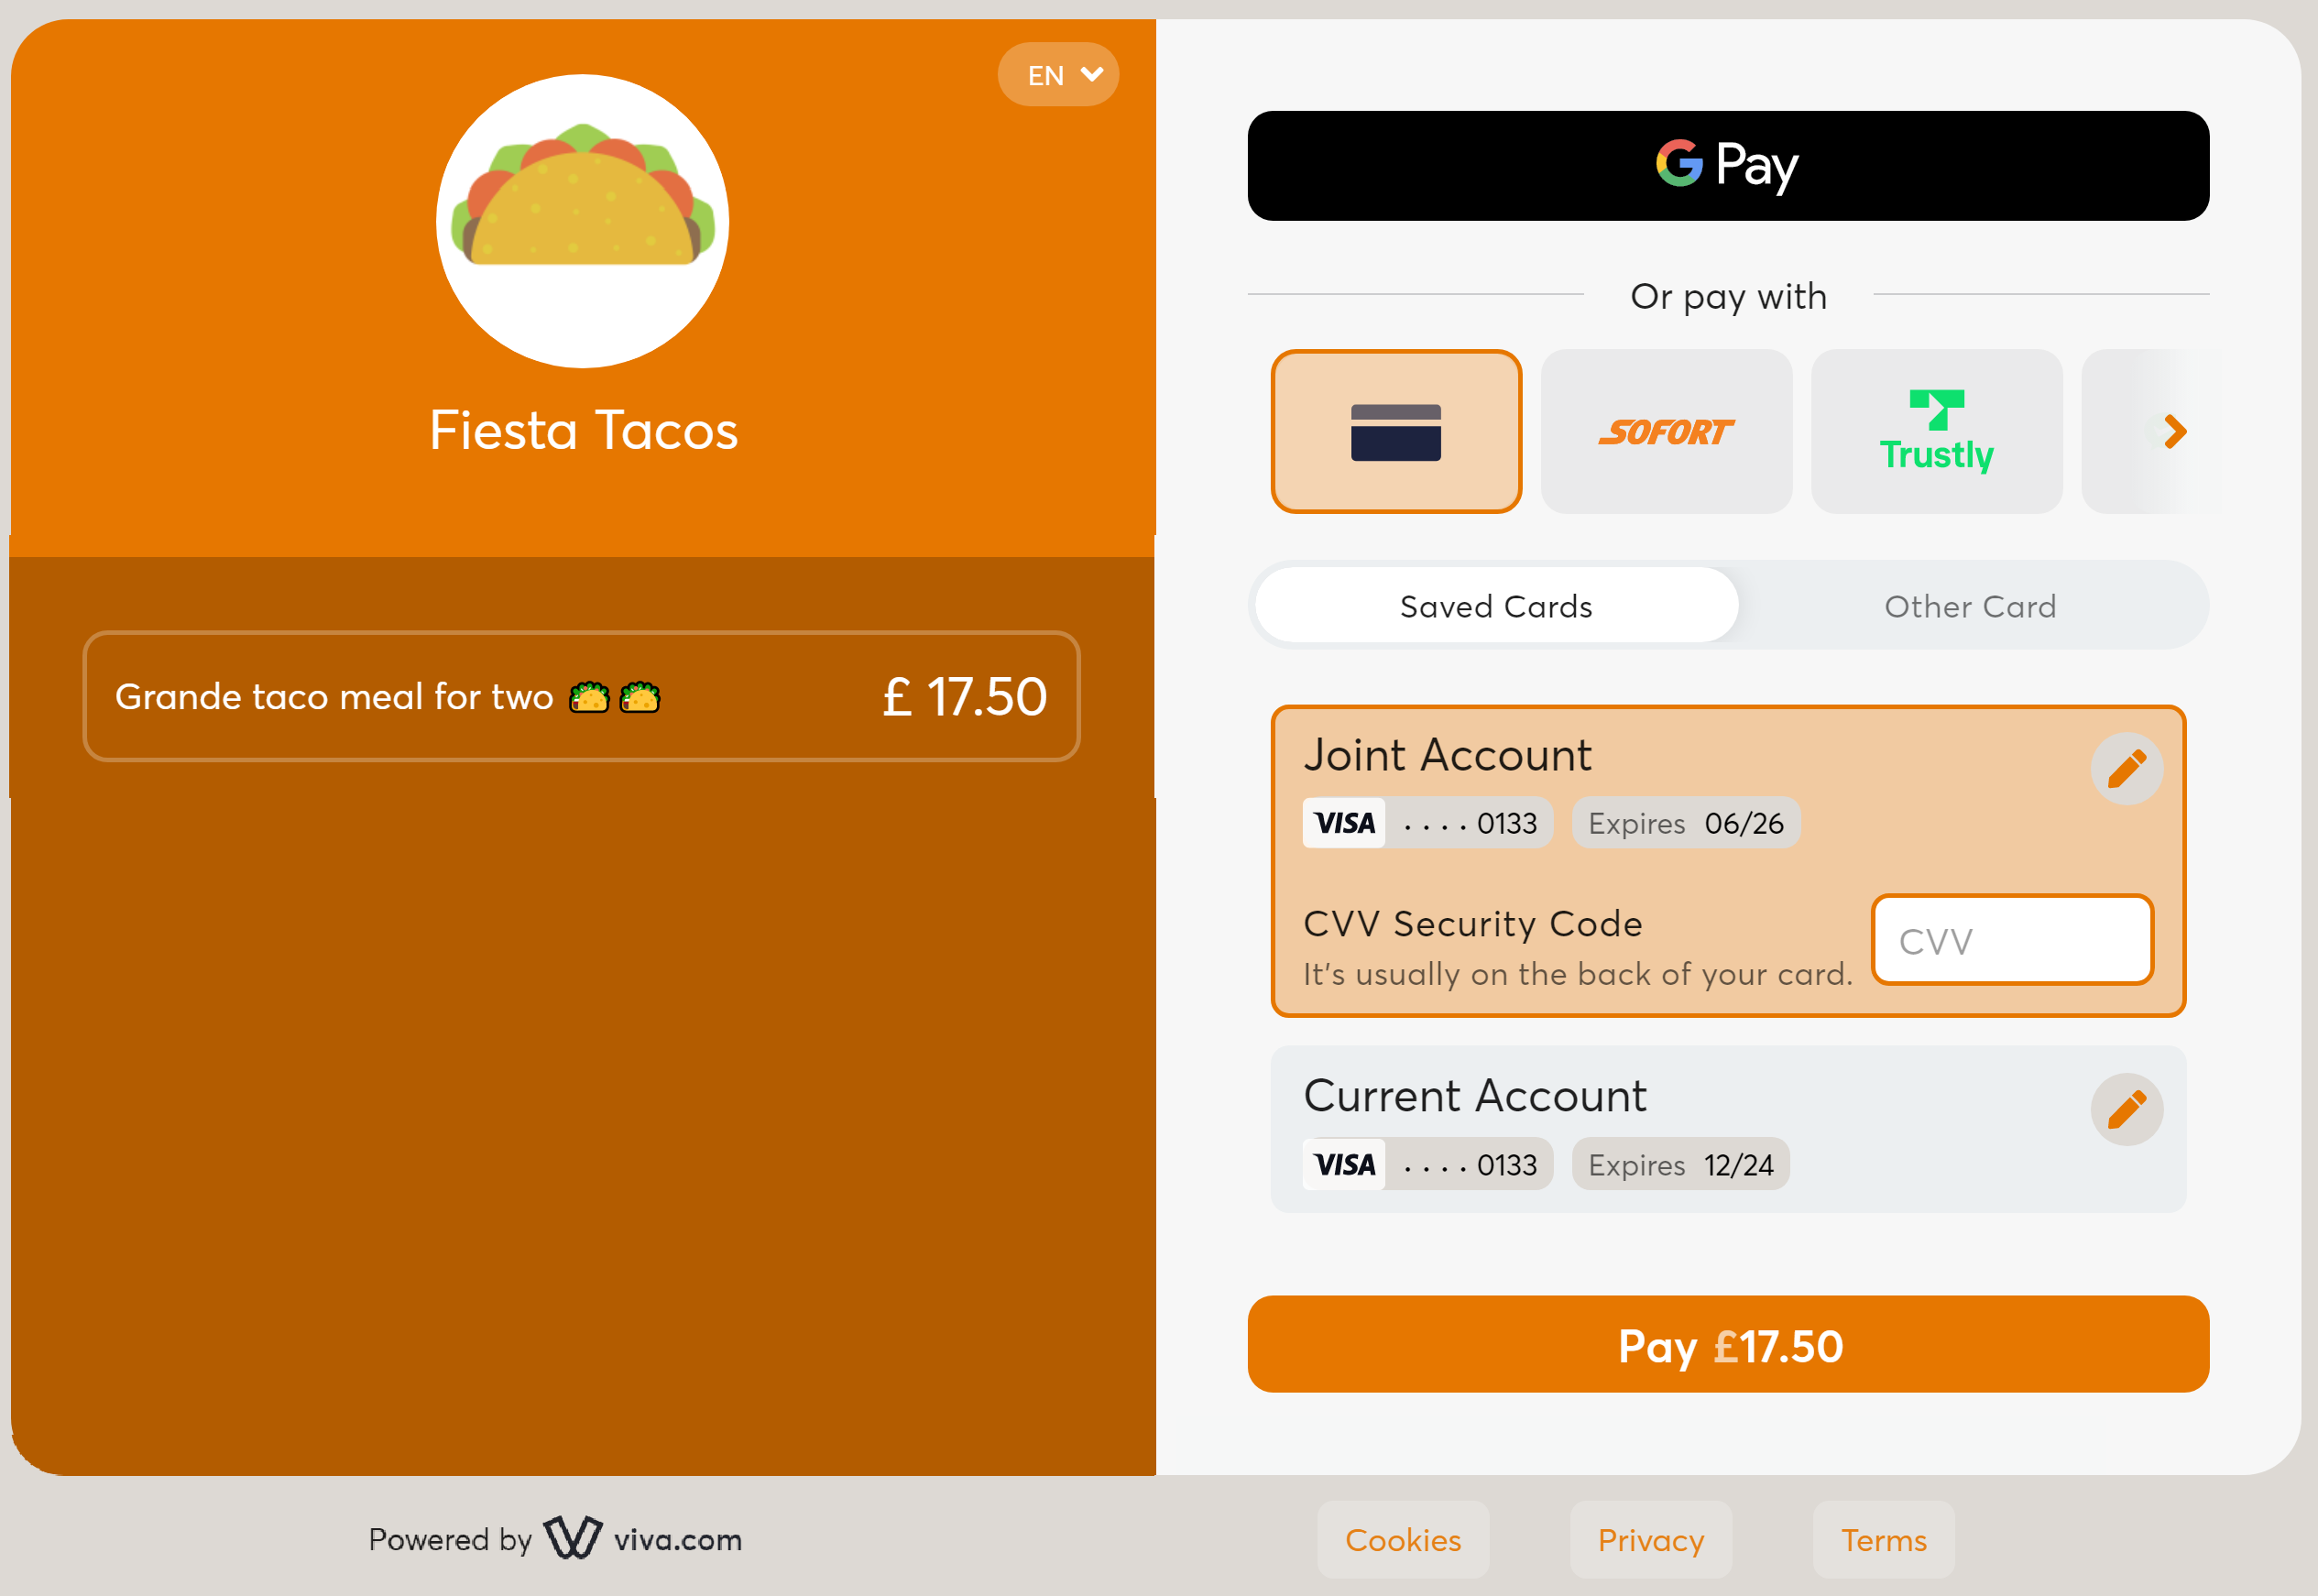
Below is the Smart Checkout form where the customer can enter their payment details and complete the payment:
allowRecurring = true or preauth = true, only payment methods which support these features will be displayed to your customers
Step 3: Confirm the payment of the payment order
After the customer makes the payment on Smart Checkout, the customer is redirected back to your website. If the payment has been successful or is pending, the customer is redirected to the Success URL, otherwise (i.e. if the payment has been unsuccessful) they are redirected to your Failure URL.
Please note that a payment may have a status of pending in case the customer used an asynchronous payment method (such as alternative payment methods, which are asynchronous in principle), meaning that it may take up to several days to confirm whether the payment has been successful. You need to use webhooks so that we inform you when the payment is confirmed as successful or failed.
Keep in mind that the Success URL and Failure URL are both specified within the payment source you have created (please refer to the Before you start section above); these can be found in your viva banking app under the payment sources for your website / app.
The redirection uses the HTTP GET method and appends the following query string parameters to the redirect Success / Failure URL:
- t (uuid): The transaction ID (may not be returned for failed transactions). Example:
t=2b4c6b5b-49ff-4e46-adc5-f53740212361. - s (int64): The unique 16-digit ID for the payment order. Example:
s=7680701046572600. - lang (string): The language of the destination page in ISO 639 defined format. Example:
lang=en-GB. - eventId (int32): Viva Event ID code. Example:
eventId=10051(Insufficient funds). - eci (int32): Electronic Commerce Indicator, a value indicating the outcome of authentication attempted on transactions enforced by 3DS. Example:
eci=1(Authenticated).
Step 4: Verify payment
You need to explicitly verify the payment status and not rely solely on whether your success or failure URL is called. This is particularly important if you offer asynchronous payment methods. Other factors, such as network connection issues and malicious hijacking attempts, can also necessitate verification.
Our recommended method for verification is using the ‘Transaction Payment Created’ webhook. Alternatively, you can make an API call to ‘Retrieve Transaction’ to verify the status of a specific payment. Both methods are outlined below.
Webhook (Transaction Payment Created) - recommended
You should use webhooks so that we can notify you when the payment is confirmed as successful or failed.
OrderCode and TransactionId parameters. You should then check the StatusId parameter to validate the status of the transaction and the Amount to validate the amount received, before updating a transaction’s status on your system. As an extra layer of confirmation, you have the option to use the Retrieve Transaction API (as outlined below)
Please note: transactionId is the unique identifier of a payment transaction. Store it after a successful payment, as it is required for follow-up actions. You can use transactionId for operations including, but not limited to:
For a full list of merchant endpoints and their details, please refer to this page.
API Call (Retrieve Transaction) - alternative
You can make a call to the Retrieve Transaction API in order to verify the status of a specific payment.
- You should make the below call through a backend channel
- You should use the OAuth2 method for authentication
Please see our ‘Retrieve Transaction’ API documentation for further details.
You can also utilise our ‘Retrieve Order’ API call to retrieve information about a specific order (even it has not yet been paid).
Integrate a mobile app with Smart Checkout
In case you need to integrate a mobile app with Smart Checkout, the above steps are still applicable but you need to adopt a slightly adjusted integration approach. Keep in mind that you still need to create a payment order, and redirect the customer to Smart Checkout, and then handle the redirect back to you and verify the payment. Details on how to integrate a mobile app with Smart Checkout can be found here.
Go-Live
Pre-Go-Live Checklist
Please refer to the following checklist to ensure you have completed all necessary steps before Go-Live.
-
Set up your payment methods (please check to confirm which need to be activated or deactivated for your use cases)
- Configure digital wallets
- Configure local payment methods
- Configure Direct Debit & other payment methods
- Apply an additional 'Service fee' - if so desired - to be added on top of the order amount if the customer chooses to pay with specific payment methods (for payment methods that support a service fee). Refer to parameter `paymentMethodFees` of the 'Create payment order' API call
- Display payment method icons or banners throughout your online store to indicate the payment methods you offer, as this will increase conversion and average order values
- Implement a proper redirect (not using an iframe)
- Test your success URL and failure URL and ensure they can handle the query parameters
- Verify the payment and retrieve transaction details
- Log EventId and X-Viva-CorrelationId if you have an error
- Make sure you’ve defined an endpoint for the Transaction Payment Created webhook
- Make sure you only allow VivaWallet IP addresses to access your webhook endpoints
- Make sure that you can receive and process a notification
customerTrns- description for the customeremail- customer's emailfullName- customer's namerequestLang- customer's languagecountryCode- affects the payment methods that will be offered to the customer
preauth- if doing pre-authorizations (authorize now, capture later via app/API)allowRecurring- if doing recurring payments (fixed or variable amount)maxInstallments- if supporting installments (customer selects number of installments)paymentNotification- if doing payment notification (Viva sends email to customer)tipAmount- if supporting tip amount (included in amount paid by customer)disableExactAmount- if supporting open amount (the customer can specify what they pay)paymentTimeout- if you need to allow more than the default 30 minutes for your customer to paycardTokens- if you need to save the card tokens of your customers in your merchant backend
- Define your logo, as it improves conversion
- Define your brand color, as it improves conversion
- Define your preselected payment method, if you prefer your customer to pay you with a specific payment method
- If using recurring payments, create a new payment from an initial payment
- If using pre-authorized payments, capture the pre-authorized payment via API
- If using card installment payments, create an additional test payment with installments
- If using merchant-side card tokenization, make sure you handle card tokens properly
phone- customer's phone numbermerchantTrns- description for youtags
Go-Live Steps
Please use the following checklist to ensure you complete all necessary steps to Go-Live.
-
Register for a live Viva account
- To do this, visit our Open your account page
-
Set up a payment source in your production account
- Visit Create a live payment source to find out how to do this
-
Authenticate using production credentials
- See OAuth2 authentication method for further details
-
Update base URLs to live
- Replace
demo.vivapayments.comwithwww.vivapayments.comin your code
- Replace
-
Final live testing with a real payment card
- Make a test purchase for a small amount using a supported card. Afterwards, you can cancel the transaction from your Viva account
Additional use cases
Recurring payments
If the payment is initiated by you (the merchant), without the involvement of the customer, you should use recurring payments, rather than one-off payments.
- Note: the first payment requires customer involvement
- Use case (merchant): charge automatically a bill or a subscription, on a regular or non-regular schedule
- Check out the following tutorial for more details: Create a recurring payment
Pre-authorizations
If the transfer of funds is to be initiated later, but you now want to ensure the customer has the required funds and in fact reserve these funds, you should use a pre-authorization, rather than a direct charge.
- Use cases (customer): make a reservation (e.g. hotel), place a pre-order, and so on
- Use cases (merchant): place a hold on the funds until the order is shipped, and so on
- Check out the following tutorial for more details: Handle pre-authorizations
Further Information
Check out the following tutorials for more details about some of the above topics:
- Use OAuth 2.0 authentication
- Create a payment order
- Create a recurring payment
- Verify a payment
- Set webhook to confirm payment
- Issue refunds via banking app or API
- Handle pre-authorizations
- Integrate with a mobile app
- Add your brand logo
- Collect payments with QR codes
- Find transaction IDs
- Set your desired payment method
- Handle payments with card installments
- Handle Card Tokens
Get Support
If you would like to integrate with Viva, or if you have any queries about our products and solutions, please see our Contact & Support page to see how we can help!